
I’ve wanted to build a weather station for a long time, probably for at least 30 years. Droughts are common here, and we rely on rain for all our household water. Our house is also quite exposed to strong winds. At one point a neighbour a couple of kilometers away had their roof blown off and I’ve wondered what we are exposed to.
Over the years, I’ve had a couple of indoor/outdoor temperature sensors and a remote rain gauge which, unfortunately, has since stopped working. But I wanted more data than just those. So, when I came across the Random Nerd Tutorials article – ESP32: ESP-NOW Web Server Sensor Dashboard (ESP-NOW + Wi-Fi) I got excited. I liked that it used remote sensors communicating via ESP-NOW and displayed the readings on a web page. I had some experience with ESP-NOW but none with running a web server, so I found understanding it quite a challenge.
Setting up the example hardware was surprisingly easy, and it worked right out of the box. However, I found a few features missing that I wanted. Don’t get me wrong. I think the example is excellent, but as with all examples, there’s a trade-off between simplicity for clarity and adding more complexity.
Features I wanted
Send readings on page load
When opening the web page, readings are not sent to the page and do not appear until a reading is received from a sensor. This is not a significant issue with the demo, because readings are sent every 10 seconds, so that’s the longest you need to wait for readings to display. I wanted it to send all data as soon as the web page is opened, as well as sending new readings as soon as they are received.
Support for different sensors
The demo is designed for two identical sensors (temperature and humidity) with identical variable types in the payload. While this makes it simple and easy to understand for the demo, I wanted to support more sensors that send different types and amounts of data. Fortunately, the payload includes the sender number, and I found I could use that to support this change.
Display the time of the reading
I wanted to include timestamps to display on the web page when readings were received. The time data to be retrieved from an online time server.
Change the variables on the web page to support new sensors
I found the HTML and JavaScript for the web page to be confusing and a bit inflexible for what I wanted. The confusion probably came from my limited knowledge. I wanted to change it to support sensors with different types of data. I also wanted my change to ensure missing data wouldn’t crash the page’s JavaScript.
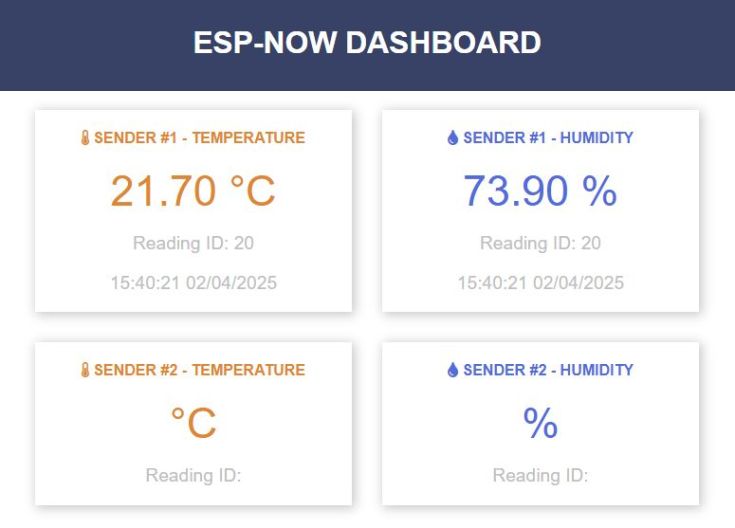
This is a screenshot of the web page with the changes. I’ve deliberately left most of it unchanged. It does include the time the reading was received.
What about Home Assistant and ESPHome?
That’s a good question, and it may be the better way. I can see that being able to graph results and keep more historical data would be useful. However, I am not familiar with it and prefer not to have a separate server running 24/7 to run it. I really don’t enjoy managing operating systems. It may be something I look at in the future.
The updated sketch
In the end, I made quite a few changes to the original demo, but in the process, I learned a lot. These modifications also make it easier for me to expand the system to accommodate additional sensor types. I currently have another project in progress that is based on this, and it is successfully getting temperature, humidity, pressure and rain measurements. That’s been running for about a month and is now stable.
I have not included the sketch for the sender code. It will work with the sender code available on the Random Nerd Tutorials article – ESP32: ESP-NOW Web Server Sensor Dashboard (ESP-NOW + Wi-Fi)
<pre class="wp-block-syntaxhighlighter-code"> /*
ESP32: ESP-NOW Web Server Sensor Dashboard (ESP-NOW + Wi-Fi) RECEIVER
This sketch is based on the receiver sketch by Random Nerd Tutorials
https://randomnerdtutorials.com/esp32-esp-now-wi-fi-web-server/
And uses MicrocontrollersLab's code to load readings on page load ESP32 SHT31 Temperature and Humidity Web Server
<blockquote class="wp-embedded-content" data-secret="b4WeGbzz7C"><a href="https://microcontrollerslab.com/esp32-sht31-temperature-humidity-web-server/">ESP32 SHT31 Temperature and Humidity Web Server</a></blockquote><iframe class="wp-embedded-content" sandbox="allow-scripts" security="restricted" style="position: absolute; visibility: hidden;" title="“ESP32 SHT31 Temperature and Humidity Web Server” — Microcontrollers Lab" src="https://microcontrollerslab.com/esp32-sht31-temperature-humidity-web-server/embed/#?secret=DsMOWHKw0G#?secret=b4WeGbzz7C" data-secret="b4WeGbzz7C" width="600" height="338" frameborder="0" marginwidth="0" marginheight="0" scrolling="no"></iframe>
*/
/*
Rui Santos & Sara Santos - Random Nerd Tutorials
Complete project details at https://RandomNerdTutorials.com/esp32-esp-now-wi-fi-web-server/
Permission is hereby granted, free of charge, to any person obtaining a copy of this software and associated documentation files.
The above copyright notice and this permission notice shall be included in all copies or substantial portions of the Software.
*/
#include <esp_now.h>
#include <WiFi.h>
#include "ESPAsyncWebServer.h" // https://github.com/mathieucarbou/ESPAsyncWebServer and https://github.com/mathieucarbou/AsyncTCP
#include <Arduino_JSON.h> // https://github.com/arduino-libraries/Arduino_JSON
#include "index_html.h" // Includes the web page code with the sketch
// Replace with your network credentials (STATION)
const char* ssid = "YourNetworkName";
const char* password = "YourNetworkPassword";
const char* ntpServer = "pool.ntp.org"; // Time server
const char* TZ_INFO = "EST-10EDT-11,M10.1.0/02:00:00,M4.1.0/03:00:00"; // NSW, Australia timezone
// Define structs for each ESP32 sender.
typedef struct struct_message_sender_1 {
int id;
float temp;
float hum;
unsigned int readingId;
} struct_message_sender_1;
typedef struct struct_message_sender_2 {
int id;
float temp;
float hum;
unsigned int readingId;
} struct_message_sender_2;
// Create variables for the ESP32 using the sender data structures
struct_message_sender_1 incomingReadingsSender1;
struct_message_sender_2 incomingReadingsSender2;
char sender1LatestTime[20]; // For the time of latest readings from sender 1
char sender2LatestTime[20]; // For the time of latest readings from sender 2
JSONVar board; // Create a JSON variable called board
String jsonString;
AsyncWebServer server(80);
AsyncEventSource events("/events");
// callback function that will be executed when data is received
void OnDataRecv(const uint8_t * mac_addr, const uint8_t *incomingData, int len) {
// Copies the sender mac address to a string
char macStr[18];
Serial.print("Packet received from mac address: ");
snprintf(macStr, sizeof(macStr), "%02x:%02x:%02x:%02x:%02x:%02x",
mac_addr[0], mac_addr[1], mac_addr[2], mac_addr[3], mac_addr[4], mac_addr[5]);
Serial.println(macStr);
int sensorId;
memcpy(&sensorId, incomingData, sizeof(int));
Serial.print("Sensor (sensorId): ");
Serial.println(sensorId);
//Get time
struct tm timeinfo;
if(!getLocalTime(&timeinfo)){
Serial.println("Failed to obtain time when data received");
}
// This method supports senders with different numbers and types of data
switch (sensorId) {
case 1:
// Copy data from incoming data to the array for sender 1
memcpy(&incomingReadingsSender1, incomingData, sizeof(incomingReadingsSender1));
strftime(sender1LatestTime, 20, "%H:%M:%S %d/%m/%Y", &timeinfo); // Record time of reading
// Print output to serial monitor fdr debugging
Serial.println("SENDER 1");
Serial.printf("Board ID %u: %u bytes\n", incomingReadingsSender1.id, len);
Serial.printf("Temperature: %4.2f \n", incomingReadingsSender1.temp);
Serial.printf("Humidity: %4.2f \n", incomingReadingsSender1.hum);
Serial.printf("Reading number: %d \n", incomingReadingsSender1.readingId);
break;
case 2:
// Copy data from incoming data to the array for sender 2
memcpy(&incomingReadingsSender2, incomingData, sizeof(incomingReadingsSender2));
strftime(sender2LatestTime, 20, "%H:%M:%S %d/%m/%Y", &timeinfo); // Record time of reading
// Print output to serial monitor for debugging
Serial.println("SENDER 2");
Serial.printf("Board ID %u: %u bytes\n", incomingReadingsSender2.id, len);
Serial.printf("Temperature: %4.2f \n", incomingReadingsSender2.temp);
Serial.printf("Humidity: %4.2f \n", incomingReadingsSender2.hum);
Serial.printf("Reading number: %d \n", incomingReadingsSender2.readingId);
break;
default:
Serial.println("Unknown sensor");
break;
}
createJSON();
// Send readings to browsers
events.send(jsonString.c_str(), "new_readings", millis());
Serial.println(jsonString);
Serial.println("----------------------------------------------");
}
void createJSON() {
// Create json string from the reading values from the readings struct
// Check if there is a value for senderId and only include those that do in the
// json. This prevents 0 values displaying on the webpage for sensors that
// have not reported a value
bool readings = false; // Used to monitor if there have been any readings since boot
if (incomingReadingsSender1.id == 1) {
board["sender1Id"] = incomingReadingsSender1.id;
board["sender1Temperature"] = String(incomingReadingsSender1.temp, 2); // Convert reading to string with 2 decimal places
board["sender1Humidity"] = String(incomingReadingsSender1.hum, 2);
board["sender1ReadingId"] = incomingReadingsSender1.readingId;
board["sender1readingTime"] = sender1LatestTime;
readings = true;
}
if (incomingReadingsSender2.id == 2) {
board["sender2Id"] = incomingReadingsSender2.id;
board["sender2Temperature"] = String(incomingReadingsSender2.temp, 2);
board["sender2Humidity"] = String(incomingReadingsSender2.hum, 2);
board["sender2ReadingId"] = incomingReadingsSender2.readingId;
board["sender2readingTime"] = sender2LatestTime;
readings = true;
}
// If we have a reading for at least one sender then prepare readings to be sent
// This check is to prevent errors if trying to stringify nothing
if (readings == true) {
jsonString = JSON.stringify(board);
}
};
void setup() {
// Initialize Serial Monitor
Serial.begin(115200);
// Set the device as a Station and Soft Access Point simultaneously
WiFi.mode(WIFI_AP_STA);
// Set device as a Wi-Fi Station
WiFi.begin(ssid, password);
while (WiFi.status() != WL_CONNECTED) {
delay(1000);
Serial.println("Setting as a Wi-Fi Station..");
}
Serial.print("Station IP Address: ");
Serial.println(WiFi.localIP());
Serial.print("Wi-Fi Channel: ");
Serial.println(WiFi.channel());
// Init and get the time using TZ method
configTzTime(TZ_INFO, ntpServer);
//displayLocalTime();
// Init ESP-NOW
if (esp_now_init() != ESP_OK) {
Serial.println("Error initializing ESP-NOW");
return;
}
// Once ESPNow is successfully Init, we will register for recv CB to
// get recv packer info
esp_now_register_recv_cb(esp_now_recv_cb_t(OnDataRecv));
/* HTML was here. Now in a separate file */
server.on("/", HTTP_GET, [](AsyncWebServerRequest *request){
request->send_P(200, "text/html", index_html);
});
// Request for the latest sensor readings, for page load
server.on("/readings", HTTP_GET, [](AsyncWebServerRequest *request){
createJSON();
request->send(200, "application/json", jsonString);
});
events.onConnect([](AsyncEventSourceClient *client){
if(client->lastId()){
Serial.printf("Client reconnected! Last message ID that it got is: %u\n", client->lastId());
}
// send event with message "hello!", id current millis
// and set reconnect delay to 1 second
client->send("hello!", NULL, millis(), 10000);
});
server.addHandler(&events);
server.begin();
}
void loop() {
static unsigned long lastEventTime = millis();
static const unsigned long EVENT_INTERVAL_MS = 5000;
if ((millis() - lastEventTime) > EVENT_INTERVAL_MS) {
events.send("ping",NULL,millis());
lastEventTime = millis();
}
}</pre>
I had to remove the HTML from the main sketch and place it in a separate index_html.h file. It contains.
const char index_html[] PROGMEM = R"rawliteral(
<!DOCTYPE HTML><html>
<head>
<title>ESP-NOW DASHBOARD</title>
<meta name="viewport" content="width=device-width, initial-scale=1">
<link rel="stylesheet" href="https://use.fontawesome.com/releases/v5.7.2/css/all.css" integrity="sha384-fnmOCqbTlWIlj8LyTjo7mOUStjsKC4pOpQbqyi7RrhN7udi9RwhKkMHpvLbHG9Sr" crossorigin="anonymous">
<link rel="icon" href="data:,">
<style>
html {font-family: Arial; display: inline-block; text-align: center;}
p { font-size: 1.2rem;}
body { margin: 0;}
.topnav { overflow: hidden; background-color: #2f4468; color: white; font-size: 1.7rem; }
.content { padding: 20px; }
.card { background-color: white; box-shadow: 2px 2px 12px 1px rgba(140,140,140,.5); }
.cards { max-width: 700px; margin: 0 auto; display: grid; grid-gap: 2rem; grid-template-columns: repeat(auto-fit, minmax(300px, 1fr)); }
.reading { font-size: 2.8rem; }
.packet { color: #bebebe; }
.card.temperature { color: #fd7e14; }
.card.humidity { color: #1b78e2; }
</style>
</head>
<body>
<div class="topnav">
<h3>ESP-NOW DASHBOARD</h3>
</div>
<div class="content">
<div class="cards">
<div class="card temperature">
<h4><i class="fas fa-thermometer-half"></i> SENDER #1 - TEMPERATURE</h4>
<p><span class="reading"><span id="temp1"></span> °C</span></p>
<p class="packet">Reading ID: <span id="readTempNum1"></span></p>
<p class="packet"><span id="readTempTime1"></span></p>
</div>
<div class="card humidity">
<h4><i class="fas fa-tint"></i> SENDER #1 - HUMIDITY</h4>
<p><span class="reading"><span id="hum1"></span> %</span></p>
<p class="packet">Reading ID: <span id="readHumNum1"></span></p>
<p class="packet"><span id="readHumTime1"></span></p>
</div>
<div class="card temperature">
<h4><i class="fas fa-thermometer-half"></i> SENDER #2 - TEMPERATURE</h4>
<p><span class="reading"><span id="temp2"></span> °C</span></p>
<p class="packet">Reading ID: <span id="readTempNum2"></span></p>
<p class="packet"><span id="readTempTime2"></span></p>
</div>
<div class="card humidity">
<h4><i class="fas fa-tint"></i> SENDER #2 - HUMIDITY</h4>
<p><span class="reading"><span id="hum2"></span> %</span></p>
<p class="packet">Reading ID: <span id="readHumNum2"></span></p>
<p class="packet"><span id="readHumTime2"></span></p>
</div>
</div>
</div>
<script>
// Get current sensor readings when the page loads
window.addEventListener('load', getReadings);
// Function to get current readings on the webpage when it loads for the first time
function getReadings() {
var xhr = new XMLHttpRequest();
xhr.onreadystatechange = function() {
if (this.readyState == 4 && this.status == 200) {
var myObj = JSON.parse(this.responseText);
console.log(myObj)
updateUI(myObj)
}
};
xhr.open("GET", "/readings", true);
xhr.send();
}
if (!!window.EventSource) {
var source = new EventSource('/events');
source.addEventListener('open', function(e) {
console.log("Events Connected");
}, false);
source.addEventListener('error', function(e) {
if (e.target.readyState != EventSource.OPEN) {
console.log("Events Disconnected");
}
}, false);
source.addEventListener('message', function(e) {
console.log("message", e.data);
}, false);
source.addEventListener('new_readings', function(e) {
console.log("new_readings", e.data);
var obj = JSON.parse(e.data);
updateUI(obj);
}, false);
}
function updateUI(data) {
if (data.sender1Temperature) {
document.getElementById("temp1").innerHTML = data.sender1Temperature;
document.getElementById("readTempNum1").innerHTML = data.sender1ReadingId;
document.getElementById("readTempTime1").innerHTML = data.sender1readingTime;
}
if (data.sender1Humidity) {
document.getElementById("hum1").innerHTML = data.sender1Humidity;
document.getElementById("readHumNum1").innerHTML = data.sender1ReadingId;
document.getElementById("readHumTime1").innerHTML = data.sender1readingTime;
}
if (data.sender2Temperature) {
document.getElementById("temp2").innerHTML = data.sender2Temperature;
document.getElementById("readTempNum2").innerHTML = data.sender2ReadingId;
document.getElementById("readTempTime2").innerHTML = data.sender2readingTime;
}
if (data.sender2Humidity) {
document.getElementById("hum2").innerHTML = data.sender2Humidity;
document.getElementById("readHumNum2").innerHTML = data.sender2ReadingId;
document.getElementById("readHumTime2").innerHTML = data.sender2readingTime;
}
}
</script>
</body>
</html>)rawliteral";
The receiver/server lives in a black aluminium box. There’s really only an ESP32 in there.

More info about the changes
Getting the time
I used the built-in time function that is in ESP32 library, so no additional library is required. I’ve used the TZ method of getting the time in our time zone with the time and date of daylight-saving set in the string. I couldn’t find a helpful link on how to do this. There must be one, because I must have used it at some point. This is the time zone for Sydney NSW, Australia.
const char* TZ_INFO = "EST-10EDT-11,M10.1.0/02:00:00,M4.1.0/03:00:00";
For our time zone daylight savings time is defined as "a period starting at 2 am on the first Sunday in October in each year and ending at 2 am on the first Sunday in the following April" So the string is made up of:

EST-10EDT-11  The time zone for normal time (UTC+10) and daylight savings time (UTC+11)

  M10.1.0/02:00:00 Change to DST
    M10 = month 10 - October
    1 = week 1
    0 = day 0 (Sunday)
    2 = hour 2:00am (when to switch to DST)

    M4.1.0/03:00:00 Switch back to 'normal' time:
    M4 = month 4 - April
    1 = week 1
    0 = day 0 (Sunday)
    3 = hour 3:00am (when to switch back from DST)
Sensors with different data types
While investigating how to deal with two senders with different payload data I settled on a method where:
- Set different structs and variables for each sender
- Ensure that the first item in the struct is used for the sender number. In the RNT code they use int id for the identifier. An alternative to differentiate the senders is to use their mac address, but I didn’t find that reliable
- In the OnDataRecv function use the id in a case statement to the appropriate sender variables
Readings display at page load
I got inspiration for this from MicrocontrollersLab’s page ESP32 SHT31 Temperature and Humidity Web Server. In this sketch the sensors are connected to the ESP that runs the server, so it doesn’t have sensors sending in readings via ESP NOW. The readings do display in nice graphs which make it worthy of a look. In this sketch it uses a call to /readings to send the readings through in JSON format and this is done at web page load. I added this in and it is working well for me. These bits went in the main sketch
// Function to get current readings on the webpage when it loads for the first time
function getReadings() {

  var xhr = new XMLHttpRequest();
  xhr.onreadystatechange = function() {
    if (this.readyState == 4 && this.status == 200) {
      var myObj = JSON.parse(this.responseText);
      console.log(myObj)
      updateUI(myObj)
    }
  };
  xhr.open("GET", "/readings", true);
  xhr.send();
}


// Request for the latest sensor readings
  server.on("/readings", HTTP_GET, [](AsyncWebServerRequest *request){
    createJSON();
    request->send(200, "application/json", jsonString);
  });
There were also some changes to the HTML. As there are now two types of events; ‘message’ and ‘new_readings’ that update the readings on the page, I added a function ‘updateUI(data)’ to handle both. This resulted in the error below. To avoid that I had to move the HTML to a separate file ‘index_html.h’
Error with HTML in main sketch
When I added the updateUI(data) function to the HTML I hit an issue. When I tried to compile the code I got an error “‘function’ does not name a type”.
I found some reports of this and it turns out that content within R”rawliteral( …..)rawliteral”; should be ignored by the compiler. However, if this is placed in the main file and it finds a function within it, then it gives an error. The workaround is to move the HTML to a separate file, so that’s what I did
These pages were helpful:
- IDE mistakes JavaScript function for type
- line directives inserted into raw string literal by sketch preprocessor 1191
- #Line driving me crazy
Server crashing
Update 1 May 2025: I have since updated to v3.2.0 and I am no longer getting this issue.
Another issue I encountered was that the server would sometimes crash, at least with the sketch I was using. I found this ESP32 Rebooting Loop with ESPAsyncWebServer. I downgraded to version ESP32 3.0.7 of the ESP32 board in the board manager and it is now stable again. By the time you read this, a newer version may have fixed the issue, but if you’re experiencing crashes, this is something to consider.
Tweaking the display of the cards
I saw a comment were someone was asking how to set the number of cards across the page. In the demo it is set to 2, so there is a lot of space on the sides of the page. This can be changed by update this lins in the HTML CSS:
.cards { max-width: 700px; margin: 0 auto; display: grid; grid-gap: 2rem; grid-template-columns: repeat(auto-fit, minmax(300px, 1fr)); }
Change max-width: 700px to allow more cards. In my working version I have set it to 1800px
Future project
My ultimate goal is to create a sketch that supports a wide range of sensors, including pressure, rain, wind, seismic events and maybe lightning strikes. I’m part way there and it’s turning into an interesting project. This is shot of the web page it currently generates.

I like to maintain a simpler reference version in my demo sketches and thought posting it here may help or inspire someone.
If you have any feedback, whether it’s spotting errors or suggesting improvements please let me know.

Leave a comment