
While I don’t have an Amateur Radio license, I do find radio interesting. I often listen to the Soldersmoke podcast and look at their blog. I became interested in the Direct Conversion Radio they had designed. The radio covers the 40-meter or 7-MHz amateur radio frequency band. It is fairly simple and deliberately uses discrete components, but the feature that convinced me to build is that receives SSB without extra circuitry.
They have set up a discord server for people who want to join the challenge. The Discord server has been fantastic. It has a good group of helpful members that assist with issues and present some really interesting builds. There are links to it at the bottom of relevant posts on their blog.
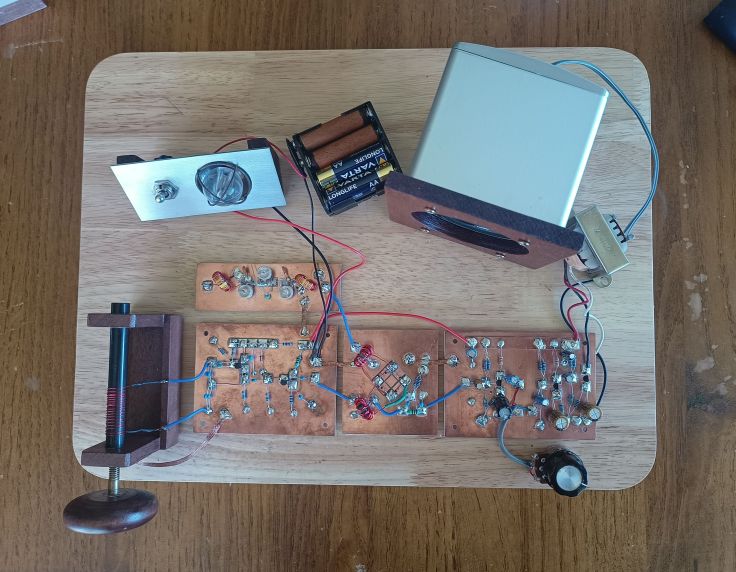
My build
I wanted to use as many parts as possible from what I already have. I had to order some parts toroid cores, transistors and some capacitors. In the end I had to do 5 different orders. I could have done it in fewer, possibly 3, but I forgot a couple of things and had to reorder.

Looking from above. The power LED includes a lantern style cover reclaimed from a set of outdoor solar lights.
Coil former
An interesting design decision is how tuning has been implemented. This is done by screwing a brass bolt in and out of a coil. This makes it a permeability-tuned VFO (variable frequency oscillator). The coil former can be 3D printed and there are the required files for that. I don’t have a 3D printer, so I made one from some scrap wood I have, or to put it another way, I free tree printed it.
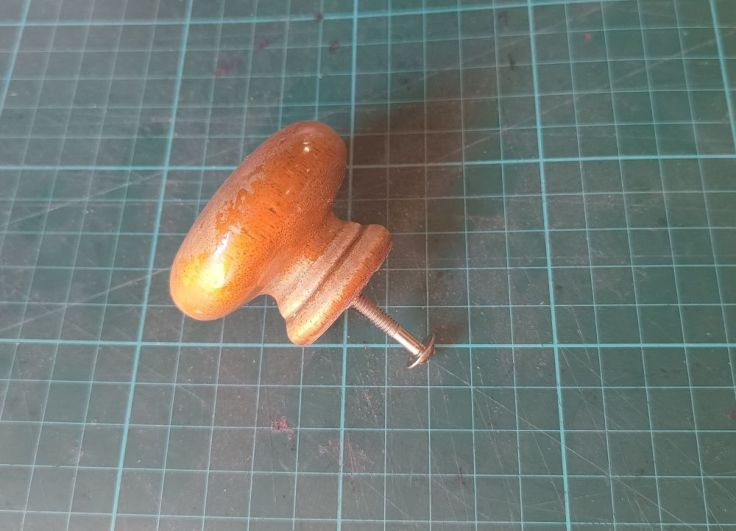
This is the knob I used for tuning. I cut the back off, then sanded and stained it.
The main part of the coil former was made from old Australian red cedar recovered from a derelict door.
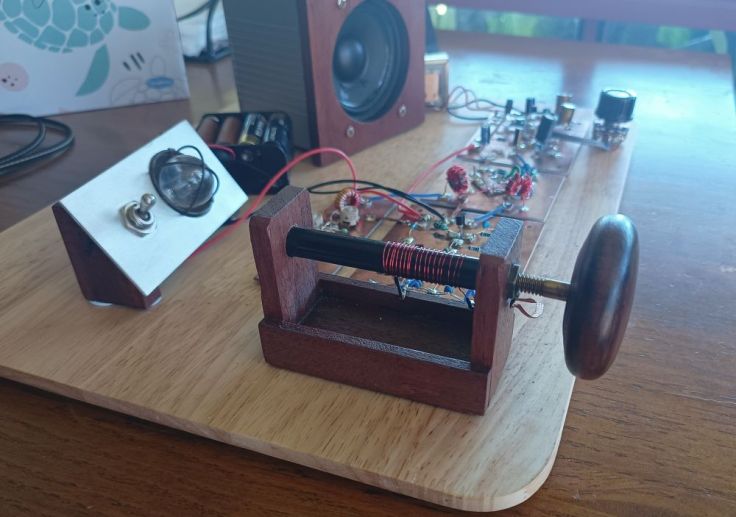
This is the part of the build that I was most happy with.

Manhattan style construction
Manhattan style construction is done by gluing individual, small pads to a blank PCB to create connection points. Many builders use MePads. These are sold by QRPme. While I encourage support of a small business and a dedicated Amateur Radio Supplier, shipping becomes significant when you live about the furthest point on the planet. I was already planning an order at Aliexpress and I noticed these. They are fairly small and only 1mm thick, but I found them to be easy to use. Unlike those pictured on Aliexpress, the ones I ordered came in strips that were routed in between.

I had intended to mount everything on an interesting old board I had, but it just wasn’t big enough. In the end I mounted my radio on a wood serving tray/chopping board. I used Blu tack a lot. I often use it to hold parts in place while soldering. I also used it to hold the PCBs and other parts onto the baseboard. That made it easy to move modules around or replace them,
At one point I was trying different transistors, and I tried using machined IC Pin sockets soldered to the board so that I could plug in different transistors. To use them I broke the pin out of the plastic strip. I tried leaving the pin as it was and other times cutting off the thin bottom part of the pin to make it sit lower on the board. I found that ticking in a long thin wire into it and holding that make it much easier to solder it in. I also ended up using these for test points for alligator clips. While I had success with these, I did find that the ones I have quickly lose their grip after a few insertions.

I found this to be quite an enjoyable way to build. These are a few things I found:
- I naturally ended up placing parts further apart than would have been ideal, especially in the audio amp that can oscillate if spread out too much
- I began using Isopropyl alcohol to clean off flux and I found that pads started to come off.
- High heat and a very large tip on the soldering iron helped the solder to flow, particularly on the main copper board and as I use lead free solder
- Sometime after gluing pads down, I came back only to find I had been a bit careless where I sat my phone, and a piece of paper was super glued over the phone cameras. I eventually got it off the cameras but the flash is more diffused than before.
Here is a short clip of the radio in action.
Learnings
I learned a lot from the project, not just about radio. I also learned more about using my oscilloscope and now feel more confident making basic readings.
What’s next?
I’m working on adding a Si5351 VFO. I can do that with parts I already have and it is something that I find interesting. After that I think I will have a break from radio as I have a lot of projects started that I would like to finish.
Find out more
You can find out more about the Soldersmoke Direct Conversion challenge:

Sounds great Gary. For a second I thought you had a “magic eye” tuning indicator! Excellent looking build, thanks for the write up. VK3TPM
LikeLike
Hi Peter. Thanks for the feedback. It has been a fun project. Oops, didn’t mean to give the impression that it was a magic eye 🙂 I just wanted to use something that IU had other than a standard LED. I did contemplate trying to connect it to the amp and have the brightness based on the signal, but not only was I not sure about the circuitry for that, I already had enough trouble getting that amp to behave.
LikeLike
It sounds great Garry – and you have a nice, slow tuning rate too. Haha – good observation on Peter’s part about the magic eye! It has been wonderful to see how many people have build direct conversion receivers as a result of this. I think that Bill and Dean were pleasantly surprised too. Congratulations on being one of the few who build their own radio gear. We are a growing group of happy builders!
73,
Dave
AA7EE
LikeLike
Hi Dave, Thanks for the comment. I learned quite a lot from building that radio and enjoyed doing it. It was fun being part of a group building them. I haven’t been doing too much more with radio. I’ve spent far too much time trying to get a weather station going, but I am starting to look at making something with a SI4732 IC which combines my interest with Arduinos.
LikeLike